Welcome to the latest stop on the Sew Free for Summer Rebecca Page Blog Tour! This tour is so fun because we’re here to help give you inspiration for ways to get EVEN MORE out of those FREE patterns. That’s right: this is a tour all about free patterns! And not just free RP patterns, but what you can do to them to get yourself something new, different or maybe that one idea you’ve been wanting for forever and just haven’t figured out. Today, you’re getting Patsy – actually I know you’re getting at least two Patsy’s today because my girl Chaney is hacking the same free pattern! Plus, Crystal hacked Patsy into a corset earlier in the week – and I’m still in awe of that idea. Also, don’t forget to read to the end for all the links to the tour and some killer giveaway info!


So… a little back story. I don’t want to shade anyone here, but…….. I was in a pattern test last year for a woven dress with a super deep front V option and I LOVED IT. I actually had planned on using it mashed with the Patsy jumpsuit pants for Romper Month. It was put on hold indefinitely while the designer dealt with some personal things, but it hasn’t started up again. It wasn’t in a place that fit well enough for me to feel comfortable using it, plus it’s an unreleased design and I wanted you to be able to actually recreate my Romper Month looks. So I scrapped my idea and figured I’d try it some other time – and then this blog tour came along! Hack a free pattern, do anything you want with it…. that’s kinda right up my alley!
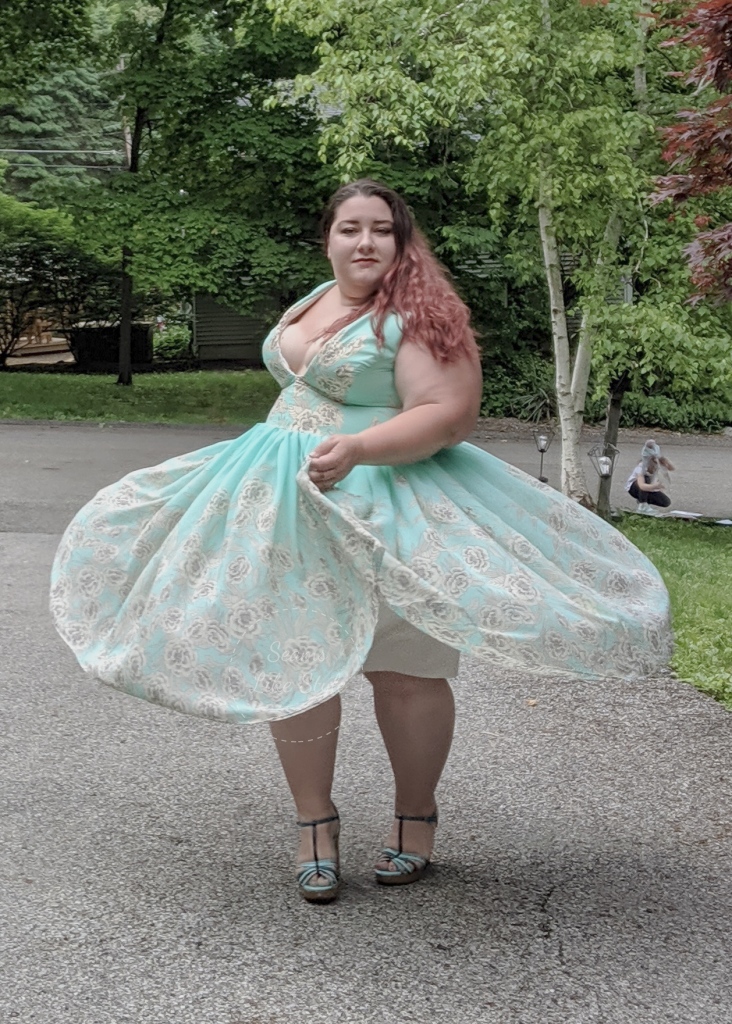
I chose Patsy because I wanted another chance at sewing up a boned bodice and I knew I might be able to make my idea come to life. So I printed out the bodice pieces, grabbed some extra paper and got to work. I held up the center front piece on my torso to mark how low I wanted the V to be, then used a ruler to create a thin triangle cut out. The underarm curve needed to be extended up towards the shoulder and in the end I decided to extend that piece to become a strap attached in the back. It almost looked quite different, with the back pieces extending up for a full coverage back and shoulder seam – but I wanted to keep that skin exposed since it is (basically) summer after all. I used my acrylic rulers and french curve to make all these changes, all just eyeballing how I wanted it to look. Remember about seam allowances, too! I needed to bring up the point of the V from my original mark because once sewn it would be waayyyyyy lower than I wanted. Cleavage, yes… completely bare, no.


I went through two fit muslins of the bodice, even though like with the Zip Up Crop earlier this week I tested this pattern and already knew my fit. I was making enough changes and testing how to do it that two was an absolute minimum need. First, I kept getting gaping along the armsyce at upper bust height, I took in the princess seam a little, but ended up sizing down above the bust 3 sizes. This isn’t actually too surprising since I have narrow shoulders and a small upper bust size , plus I’m short in the upper chest and neck. I could have done this in my final test too, the upper chest piece is actually way too large on me and needed to be folded over to look right. Hindsight and all. Doing this helped a ton with support , but I still had the low neckline to deal with, there was no way I could wear a bra so I needed another solution. Adding the boning and a stiff interlining would create some structure, but I didn’t think it would be enough. I started to look into some couture and wedding dress techniques but couldn’t find many options for such a low cut. I finally landed on sewing in bra cups, knowing that I’d have to cut them to not show anyway. A rare solo Walmart trip scored me a cheap bra and I got to work. Once the lining was sewn together, I basted the back together and slipped it on over the bra. Note* my lining fabric had some stretch to it, if yours doesn’t, you could baste a zipper or have someone else pin you in – I was home with only my toddler during this. I pinned the bra cups in place along all sides and carefully took off the lining. ALSO REMEMBER that your lining needs to be wrong side out, finished side against your body. Carefully, I stitched along the inside of the underwire to attach the cups to my fabric, but I decided to leave it not attached to the lining otherwise so that it wouldn’t pull the dress in above the bust. I did still stitch around the entire cup and especially where I’d be cutting it so it wouldn’t fray apart, especially along the center front.
The interlining I used is an off white denim, I cut it using the same pieces as the rest of the bodice and added boning almost exactly as the pattern calls for. There was enough left to create the boning casings, too. I cut 1.5″ strips, ironed it like a single fold bias tape and stitched it down over the seams with the end folded under. The lower ends of each casing were left open, but stitched across to keep the boning (zip ties again!) inside and then enclosed in the waistband seam later on. There’s boning along each seam of the bodice, a small one at the center front and one along each lower side of the V, about 6″ long. Between this, the tight fit, the added straps and the bra cups – I’m completely supported by the dress alone! I could even jump up and down without *much* worry (there’s a chance I could slip up and out into the V if I jump a lot, but even that’s doubtful).


To finish up, I added two skirt layers. One in my lining fabric that’s a straight rectangle the same width as the bodice, remember it has some stretch? Then, I cut some more rectangles… this time in my main fabric 4 times the width, gathered to the width of the under skirt. With those basted together, I treated it as one skirt to attach to the bodice. An invisible zipper, a rolled hem and handstitch the straps to the back of the bodice and it’s done! I did go back and add a waist stay as well to help keep everything in place, but it’s really not needed. I cut the same denim fabric with my pinking rotary blade about 2″ wide and handstitched that to each seam of the lining right about the waist seam. A waist stay is meant to be tighter than the dress itself, so I made sure to keep it snug through each section and then added hook and eyes to the end, slightly off center from the zipper.
I loved making this, even though I left myself with not as much time as I’d like so it was a stressful make. Hubs said it would make a great prom or other formal wear dress – though he’s glad I don’t make these often! I spent less than $100 and had a bunch of fabric left over, too. I ordered 6 yards of the chiffon (on sale for $1.99!) and have probably 3 left, plus 4 yards of the lining (I think it was a sanded satin) and I’ve got almost 2 left of that as well! I’ve now got a custom made, custom designed, one of a kind dress… worth at least $700, if not wayyyy over that if my research is to be trusted. Hey Christian Siriano, call me.


Links
Rebecca Page Patsy Party Dress
Joann’s Sanded Satin | Joann’s Bull Denim | Fabric Mart Chiffon
More Inspiration
Please visit all the stops on the Rebecca Page Sew Free for Summer Blog Tour for more great inspiration:
- Sunday May 26: Rebecca Page (intro)
- Monday May 27: The Sewing Unicorn, Stitched by Jennie
- Tuesday May 28: Jot Designs
- Wednesday May 29: bigflynotions
- Thursday 30: Liviality, Kitty Makes It
- Friday May 31: Seams Like Style, Patchwitch, Twinkle Toes and Company
- Saturday June 1: SequoiaLynn Sews, Sewista Fashionista
- Sunday June 2: Misty and Mim
Prizes
We will be giving away a pattern bundle of choice each day PLUS an overall grand prize of a $50 pattern credit. To stand a chance to win, all you have to do is comment on each blog, each day so stay tuned to the Rebecca Page Sewing group for updates from our bloggers!

Wow im learning alot of techniques here. Thank u for sharing
LikeLike
You’re so welcome, glad to see you here!
LikeLike
Beautiful dress would be great for a party or wedding
LikeLike
Thanks, that’s what I thought, too!
LikeLike
Awesome job hacking that pattern! I don’t think I would have been brave enough to try that many changes 🙂
LikeLike
Thanks! Funny enough, it doesn’t seem like all that many changes to me…. It’s just about taking it one step at a time.
LikeLike
I love not having to wear anything under my tops! This is great…. Thank you for sharing
LikeLike
It was so freeing!
LikeLike
I love the whole summery flounce of that dress, and the neckline is perfect. Being able to take a pattern and make it your own is an enviable skill. I no longer wear dresses but this is enough to tempt me.
LikeLike
Thanks so much! I don’t really wear dresses all that much, but sometimes I can’t help but to make them.
LikeLike
That is a lovely dress!
LikeLiked by 1 person
Beautiful dress and I loved how you added the bra to it.
LikeLiked by 1 person
Nicely written and explained, the dress is lovely.
LikeLike
Thanks so much, glad you enjoyed it!
LikeLike
Wow! That’s a dress hack, I love how you’ve added the bra, some dresses of mine could use a hack like that
LikeLike
Right!? Straps are such pesky things!
LikeLike
This is such a dramatic dress. I like the idea of having the bra included.
LikeLiked by 1 person
This is gorgeous!
LikeLiked by 1 person
Loved this! Thanks for sharing.
LikeLiked by 1 person
I’m always amazed at how easy you guys make it sound to hack a pattern!
LikeLike
It definitely gets easier with practice! I know it’s probably easier when you can visualize the flat pattern as a 3d piece, though, and sometimes that’s tough!
LikeLike
AMAZING!
LikeLiked by 1 person
I was wondering how this would be worn without a bra, thank you for the detail about support.
LikeLike
You’re welcome!
LikeLike
Holy wowza! I’d be terrified of flopping out, you are killing it though!
LikeLike
It’s definitely right on that borderline, but I did jump tests and didn’t have any problems!
LikeLike
I need to be better about making muslins, I love your dedication to getting the fit perfect and making as many muslins as needed. I love that fabric, and so impressed that you found such a great deal!
LikeLike
Oh there’s lots if times I definitely skip the muslin haha! Most knit pieces I don’t, but if I’m hacking something woven I make sure to test it. Fabric Mart is the best for those deals – check them out!
LikeLiked by 1 person
Congrats on your beautiful dress! I love that fabric!
LikeLiked by 1 person
Wow that’s great
LikeLiked by 1 person
Beautiful dress! 100% would wear to weddings/other formal functions.
LikeLike
Yes, my hubs said it would make a good base for a wedding dress, too!
LikeLike
Love you deep V, that is awesome that you are secured in there so well with such a deep v! Great job. I also love the flow of your dress!
LikeLiked by 1 person
Beautiful hack! It looks lovely on you!
LikeLike
You look awesome! And such a wonderful hack, so well done!
LikeLike
Beautiful!
LikeLike
Wow, awesome dress!!
LikeLike